3D Graphics in WPF
3D Graphics:
WPF provides functionality for developers to develop rich UI using 3D graphics content.
3-D graphics in WPF is possible using an element, Viewport3D, Viewport3D acts like a 2d container to show 3D Content.
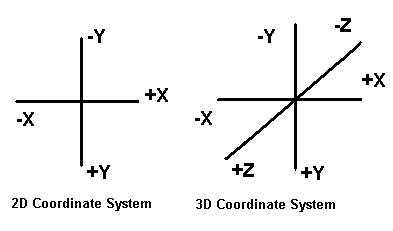
These are the representations of 2D and 3D co-ordinates system
Things to consider for creating 3D Models:
1. Creating the 3D view areas, setting cameras and projections
2. Defining models.
3. Applying materials to 3D object models.
4. Creating light sources
5. Transforming and Animating Models
Namespace: System.Windows.Media.Media3D
Cameras and Projections:
To view a 3D model in a different angle use the cameras. The ProjectionCamera will allow you to specify different projections.This can be positioned at a distance from model. NearPlaneDistance and FarPlaneDistance properties of ProjectionCamera allow you to limit the range for the projection.
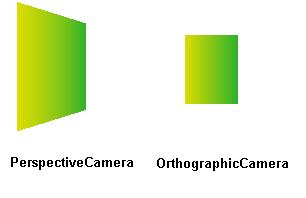
Two types of Cameras are provided by WPF:
• PerspectiveCamera
• OrthographicCamera
Perspective camera: PerspectiveCamera provides vanishing-point perspective.Shows the point where the edges of the surfaces tend to join.
<PerspectiveCamera
FarPlaneDistance="20"
LookDirection="0,0,1"
UpDirection="0,1,0"
NearPlaneDistance="1"
Position="0,0,-3"
FieldOfView="45" />
Orthographic Camera:Edges look parallel. This shows an orthogonal projection of a 3-D model to a 2-D surface.
<OrthographicCamera
FarPlaneDistance="20"
LookDirection="0,0,1"
UpDirection="0,1,0"
NearPlaneDistance="1"
Position="0,0,-3"/>
Model and Mesh Primitives:
To view some objects on scene use the object derived from model3D.WPF supports modeling geometries using GeometryModel3D and the Geometry property of this model takes a mesh primitive. 3D primitive is a collection of vertices that form a single 3-D entity. PF 3-D system currently provides the MeshGeometry3D class, which allows you to specify any geometry.
Two types of 3D models:
• Mesh
• Solid
The Mesh is a model defined using surfaces, formed using triangle. The solid model is it defined using volume. The WPF supports 3D models based on the mesh geomentry.
To create model first create the Positions,then create the TextureCoordinates followed by TriangleIndices.
<GeometryModel3D.Geometry>
<MeshGeometry3D
TriangleIndices="0,1,2 3,4,5 "
TextureCoordinates="0,0 1,0 1,1 1,1 0,1 0,0 "
Positions="-0.5,-0.5,0.5 0.5,-0.5,0.5 0.5,0.5,0.5
0.5,0.5,0.5 -0.5,0.5,0.5 -0.5,-0.5,0.5 " />
</GeometryModel3D.Geometry>
Applying Materials to the Model:
To give the mesh 3 dimesnsional look Apply material to the created mesh surface so that it can be projected from camera.Depending on the material surface property, it gets illuminated differently when the light rays fall on the surface of mesh.
Three types of materials, based on their light reflecting property:
• Diffuse Material – this will not reflect light.
• Specular Meterial –This reflects light.
• Emissive Material –This will emit light based on color of brush.
<GeometryModel3D.Material>
    <MaterialGroup>
     <DiffuseMaterial>
      <DiffuseMaterial.Brush>
        <LinearGradientBrush StartPoint="0,0.5" EndPoint="1,0.5">
        <LinearGradientBrush.GradientStops>
         <GradientStop Color="Yellow" Offset="0" />
         <GradientStop Color="LimeGreen" Offset="1" />
        </LinearGradientBrush.GradientStops>
        </LinearGradientBrush>
        </DiffuseMaterial.Brush>
      </DiffuseMaterial>
    </MaterialGroup>
</GeometryModel3D.Material>
Illuminating the Scene:
To make the 3D model visible apply light. This will create different effect s like shadow, reflection effect on the materials surfaces.
Four types of lights:
• Ambient light - illuminates all objects uniformly, regardless of its orientation and location.
• Directional light - It has only the direction vector, but no specified location.
• Point light – It is based on position. The objects closer to the light get more illuminated than the objects in the far.
• Spot light - it is derived from the point light and directional light. They have both direction and position.
<ModelVisual3D.Content>
    <AmbientLight Color="#FFFFFF" />
</ModelVisual3D.Content>
From Code Behind:
DirectionalLight dirLight1 = new DirectionalLight();
dirLight1.Color = Colors.Blue;
dirLight1.Direction = new Vector3D(-5, -6, -7);
modelGroup.Children.Add(dirLight1);
Transforming Models:
It is not possible to change the vertices that define the model, change the size or to rotate . Transforming complete 3D models is possible. Model object has a Transform property with which it can be moved, rotataed, or resized . All 3-D transformations inherit from the abstract base class Transform3D; these include classes like TranslateTransform3D, ScaleTransform3D, and RotateTransform3D. The WPF 3-D system also provides a MatrixTransform3D class that lets you specify the same transformations in matrix operations.
<GeometryModel3D.Transform>
     <TranslateTransform3D x:Name="transform3D" OffsetX="0"
     OffsetY="0" OffsetZ="0" />
 </GeometryModel3D.Transform>
<RotateTransform3D>
   <RotateTransform3D.Rotation>
     <AxisAngleRotation3D x:Name="rotation" Axis="0,3,0"
     Angle="40" />
   </RotateTransform3D.Rotation>
 </RotateTransform3D>
Animating Models:
Finally to visualize the 3D models in motion use the animation. This is based on time interval and location.
The object or group of objects, camera, light, or combination of these is animated.
The properties of these WPF elements are changed at different time interval to create animation effect.
RotateTransform3D rTransform = new
RotateTransform3D(new AxisAngleRotation3D(new Vector3D(0, 3, 1), 2));
Vector3DAnimation vAnimation = new
Vector3DAnimation(new Vector3D(-1, -1, -1),
new Duration(TimeSpan.FromMilliseconds(5000)));
vAnimation.RepeatBehavior = RepeatBehavior.Forever;
rTransform.Rotation.BeginAnimation(AxisAngleRotation3D.AxisProperty,
vAnimation);